Set up the x402 payment flow
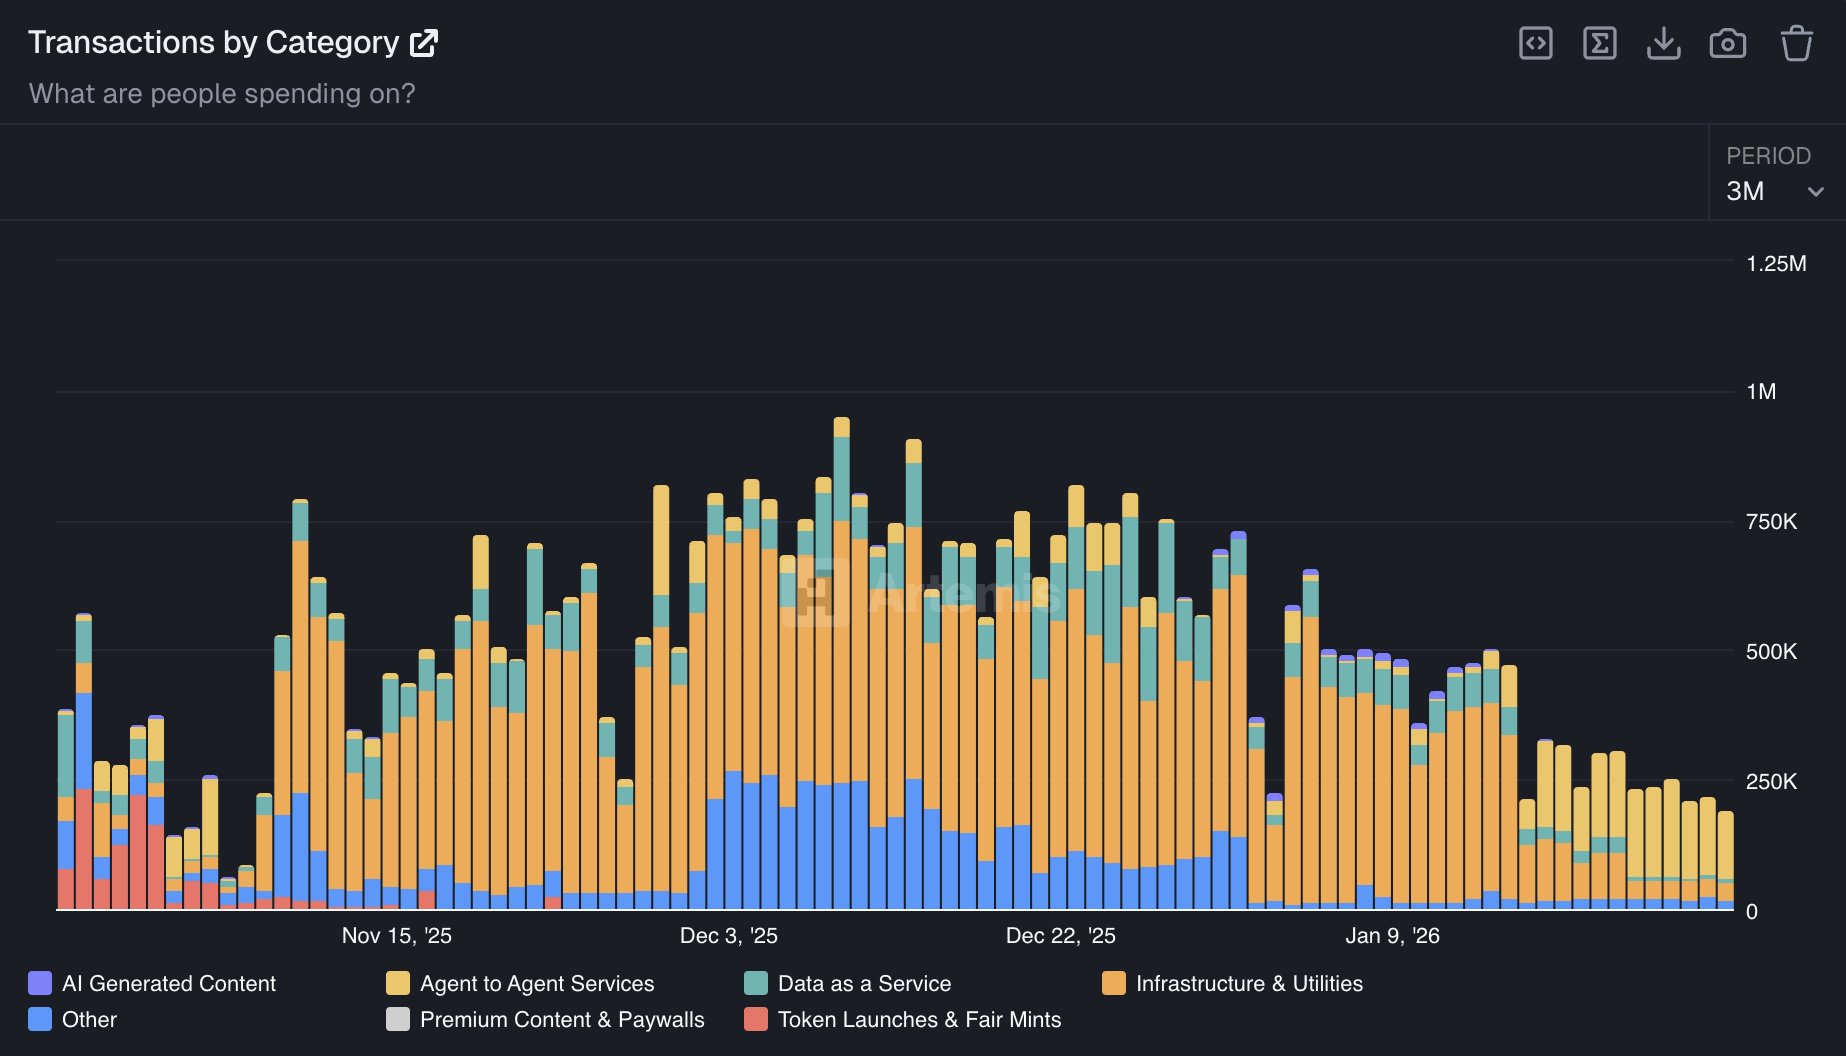
The x402 protocol transforms a standard API endpoint into a self-contained commerce node. Instead of relying on third-party payment processors or subscription gateways, the endpoint itself dictates the terms of service and payment verification. For AI trading signals, this means your agent can request data, receive a payment instruction, settle the cost in USDC, and immediately retry the request to receive the signal.
This handshake is automated, deterministic, and requires no user intervention once configured. The flow follows a strict sequence: request, rejection with payment details, payment execution, and final data delivery.

Your AI agent initiates a standard HTTP GET request to your endpoint. At this stage, no payment has been made. The request looks identical to any other API call, ensuring compatibility with existing agent frameworks that expect standard RESTful interactions.
Your server detects the unpaid request and responds with a 402 Payment Required status code. Crucially, the response body contains a JSON payload with the payment instructions: the destination wallet address, the exact USDC amount, the transaction ID (nonce) to prevent replay attacks, and the specific ERC-20 token contract. This payload acts as the invoice for the trading signal.
The AI agent parses the 402 response, constructs a transaction, and sends USDC to the specified wallet address on the configured blockchain. The agent must wait for the transaction to be confirmed on-chain. This step ensures that payment is final and irreversible before any data is released.
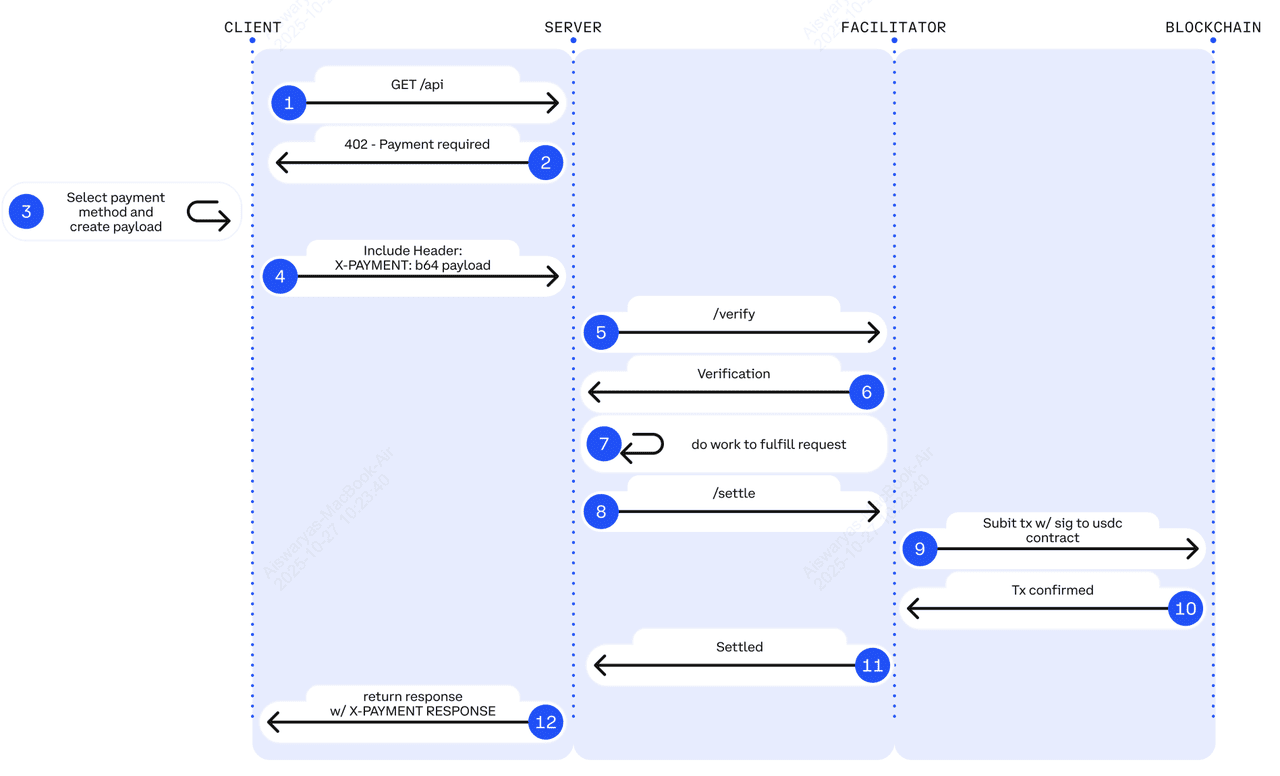
Once the on-chain transaction is confirmed, the agent constructs a new request. This time, it includes the original request headers plus a x-payment-receipt header (or similar standard field) containing the transaction hash and proof of payment. This retry signals to your server that the debt has been settled.
Your server receives the retry request, verifies the transaction hash against the blockchain to ensure the correct amount was paid to the correct address, and then returns a 200 OK status with the trading signal data. If verification fails, the server rejects the request again, maintaining the integrity of the payment flow.
This flow ensures that you are paid before your valuable trading data is exposed. By embedding the payment logic directly into the HTTP response codes, x402 eliminates the friction of traditional payment gateways while providing a robust, audit-ready trail of every signal served.
Configure headers for agent recognition
Before your x402 endpoint processes a trading signal, it must first validate the request headers. This is where the server identifies the AI agent and the facilitator handling the transaction. Without these specific headers, the payment flow breaks, and the agent cannot retrieve the signal data.
The core requirement is the x-api-key header. This acts as the agent's digital signature. You must configure your endpoint to verify this key against your internal registry or blockchain wallet address. If the key is missing or invalid, the server should immediately return a 401 Unauthorized or 403 Forbidden status code, halting the request before any computational resources are wasted.
Additionally, include the x-facilitator header if you are routing payments through a third-party processor. This header tells the endpoint which facilitator to trust for the transaction confirmation. It ensures that the payment verification comes from a recognized source, preventing spoofing attempts.
Here is a quick checklist for your header configuration:
-
Verify x-api-key presence and validity.
-
Check x-facilitator if using a middleware processor.
-
Return 401/403 for missing or invalid keys.
-
Log failed attempts for security auditing.
Integrate USDC Stablecoin Payments
To make your AI trading signals accessible via x402, you need to configure your endpoint to accept USDC on a supported blockchain. Base is the recommended choice for this implementation due to its low transaction fees and Coinbase integration, which simplifies the developer experience. Ethereum Mainnet is also supported but carries significantly higher gas costs that can eat into your profit margins on small, per-request payments.
The payment flow follows a strict sequence: the client requests a signal, your endpoint returns an HTTP 402 status with a payment request, the client signs and broadcasts the transaction, and your backend verifies the on-chain receipt before delivering the data. This handshake ensures you are paid before any proprietary data leaves your server.
1. Configure Payment Parameters
Define the stablecoin address, amount, and chain ID in your x402 response headers. For USDC on Base, use the official contract address 0x833589fCD6eDb6E08f4c7C32D4f71b54bdA02913. Set the amount in the smallest unit (6 decimals for USDC) to avoid floating-point errors. The header x-payment-request must contain the signed payment payload that the client’s agent or wallet will interpret.
2. Handle the Payment Request
When your endpoint detects a request for a protected signal, it should not return the data immediately. Instead, return an HTTP 402 Payment Required status. Include the x-payment-request header with the necessary metadata: the chain ID, the recipient address (your wallet), the token address, and the exact amount owed. This instructs the client’s x402 library to initiate a transaction on the specified blockchain.
3. Verify On-Chain Receipts
Warning: Never deliver data based solely on a client’s claim that payment was sent. You must verify the transaction on-chain. Use a block explorer API or a reliable node provider to check that the transaction hash included in the client’s subsequent request (or a separate verification endpoint) matches the expected payment. Confirm that the USDC transfer is confirmed on the blockchain (e.g., 1-2 confirmations on Base) and that the amount matches your request exactly.
Once verified, you can safely return the trading signal. Implement a short-lived token or session ID that is only issued after successful payment verification to prevent replay attacks or unauthorized access.
Design signal delivery endpoints
The core of an x402 endpoint is the payment gate. Before your AI trading signal leaves the server, the endpoint must verify that the caller has paid. This isn't just a formality; it is the primary defense against API abuse and data scraping. In the high-stakes world of trading, giving away premium signals for free is a direct loss of revenue and intellectual property.
Start by configuring your API to reject requests without a valid x402 header. When a client calls your endpoint, your server checks for a recent, successful transaction on the specified blockchain. If the payment is missing or expired, the server returns a 402 Payment Required status. This forces the AI agent or user to complete the transaction before accessing any data.
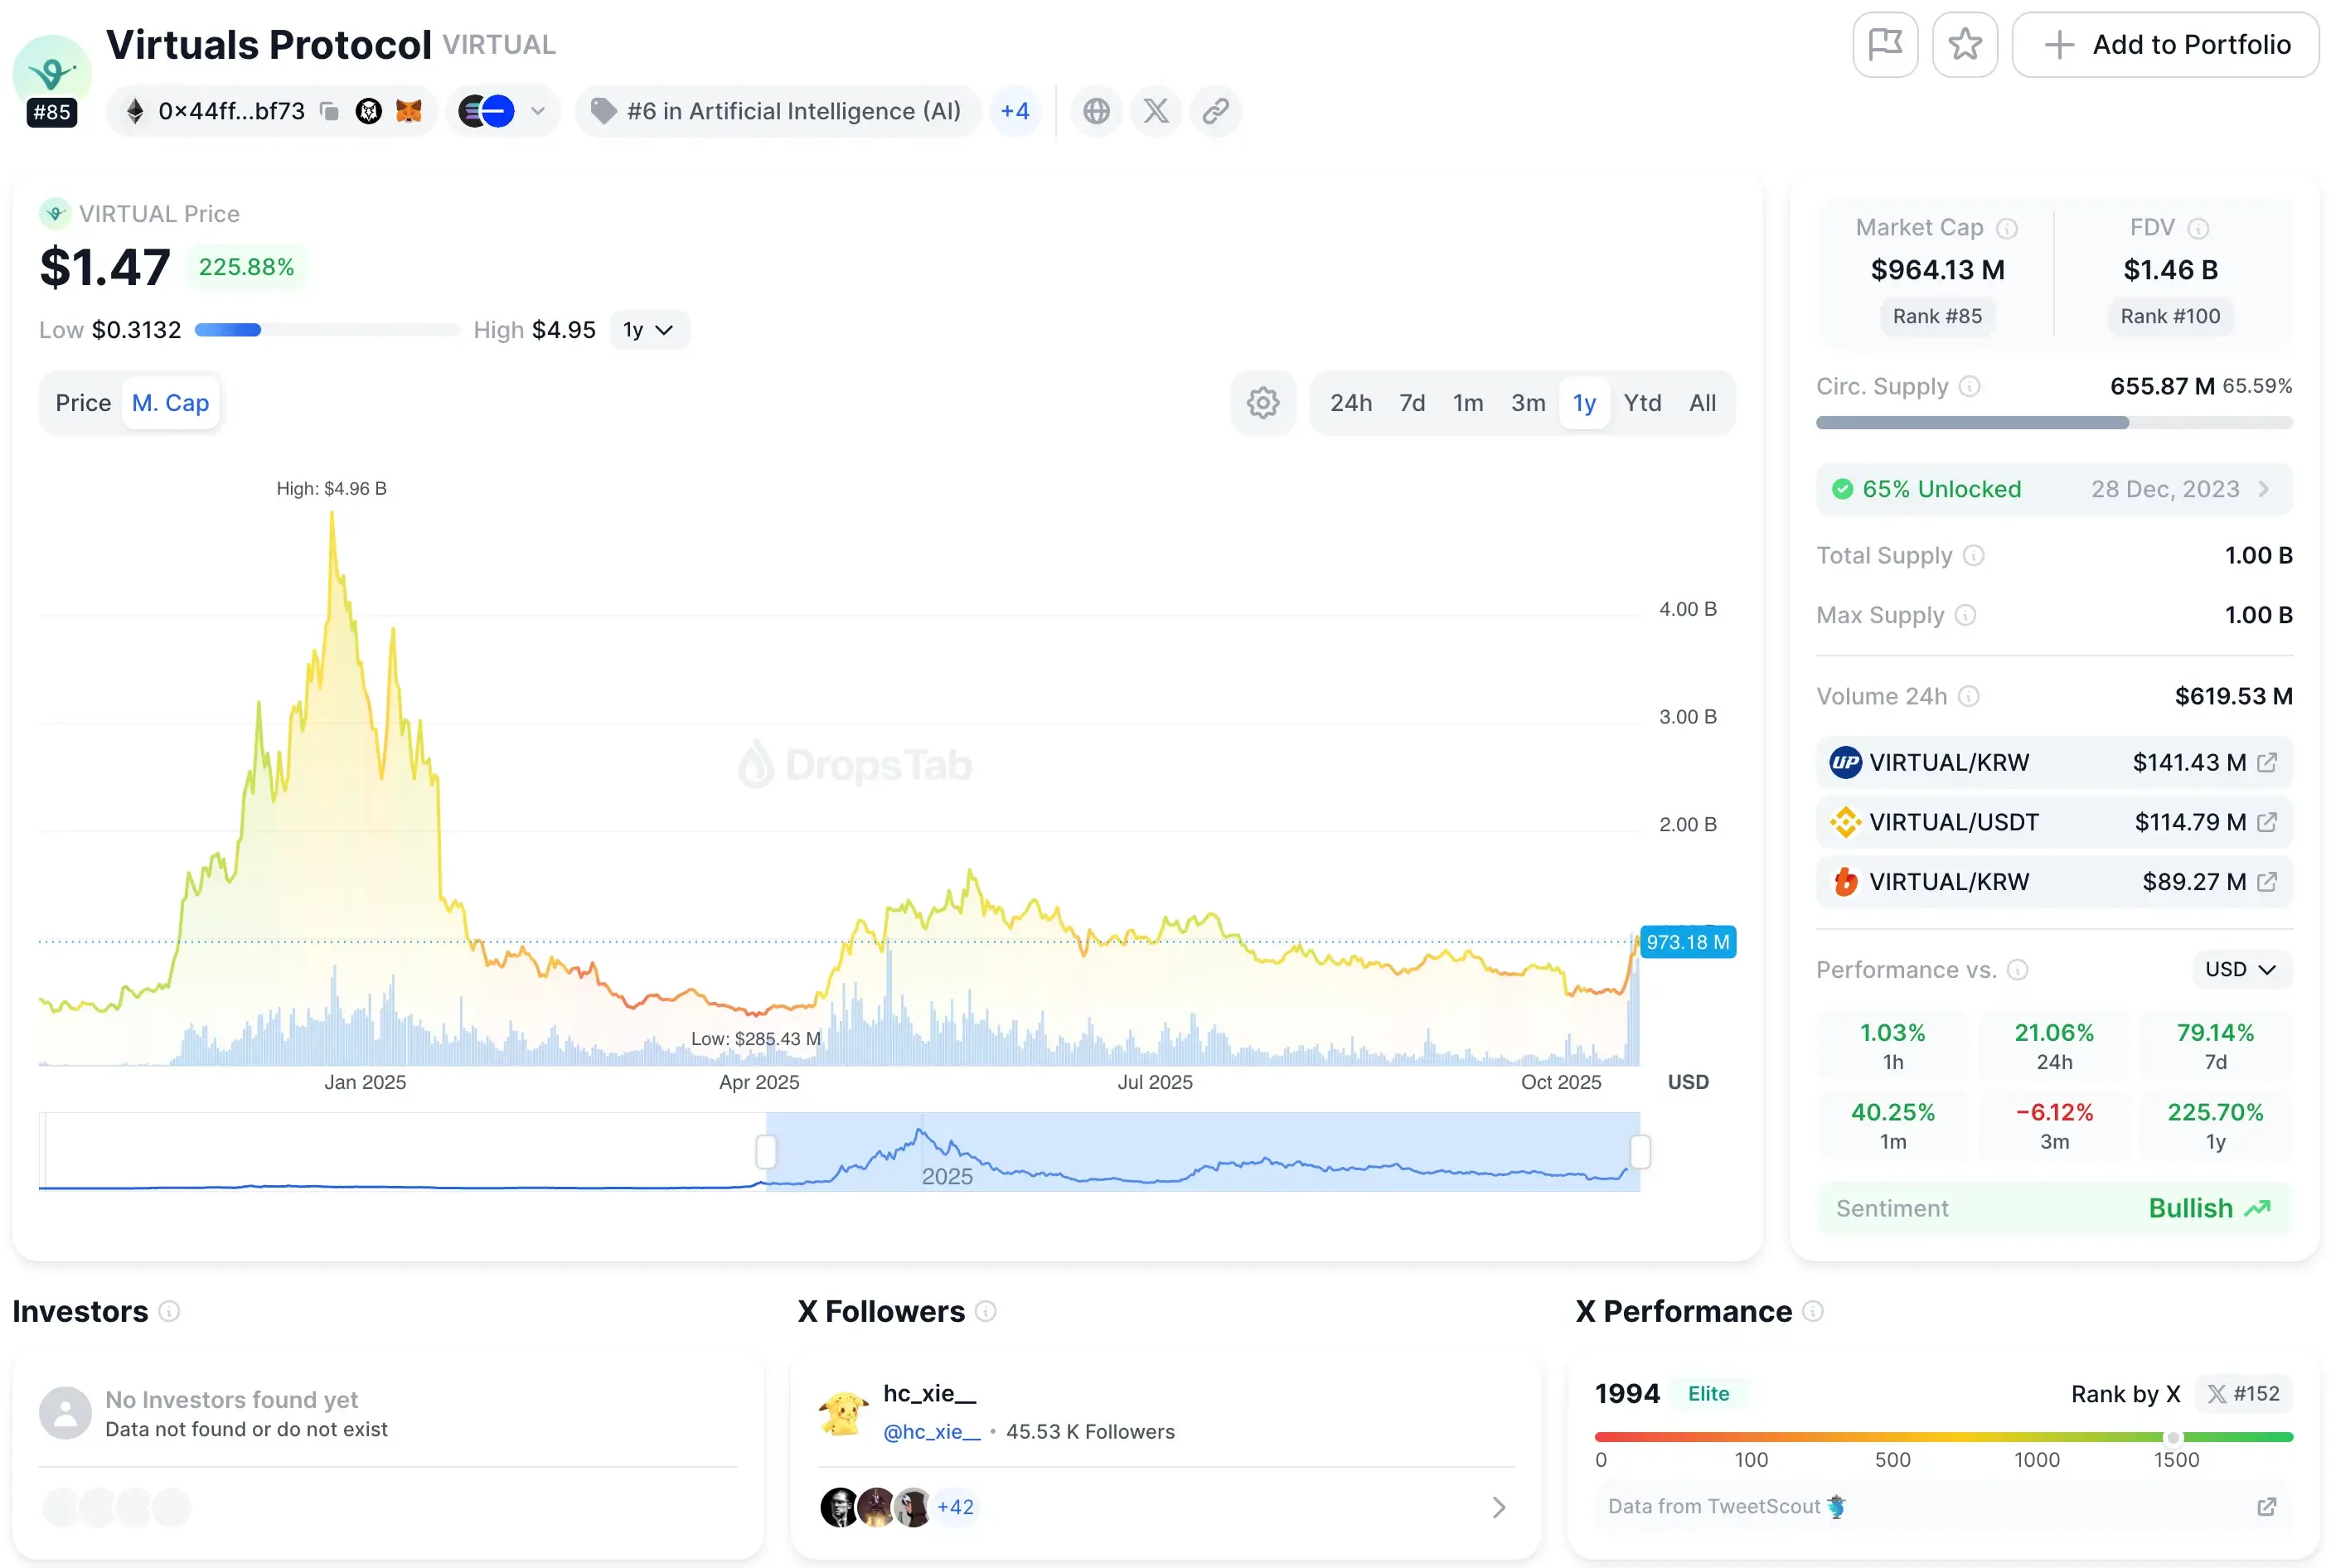
Once payment is confirmed, the endpoint delivers the signal. Structure the response to include the asset, direction (long/short), and entry price. To demonstrate the value of this paid access, you can embed a live chart of the asset being signaled. This visual proof helps users understand why the signal is worth the payment. Always include a timestamp in your response. This ensures the signal is fresh and prevents users from reselling outdated data. By tying access directly to payment, you create a self-sustaining loop where every signal delivered is backed by a verified transaction.
Handle common integration errors
The easiest mistake with Build x402 Endpoints for AI Trading Signals is changing too much at once. Rename devices, move networks, update firmware, or adjust permissions one at a time. When setup fails, the last change should be obvious enough to undo without rebuilding the whole configuration. Do not treat a successful app screen as the final test. Use the physical control, the app, and any connected automation to confirm the setup works from every path the reader will actually use.
The simplest way to use this section is to keep the setup small, verify each change, and record the stable configuration before adding optional accessories.
Verify your x402 implementation
Build x402 Endpoints for AI Trading Signals works best as a clear sequence: define the constraint, compare the realistic options, test the tradeoff, and choose the path with the fewest hidden costs. That order keeps the advice usable instead of decorative. After each step, pause long enough to check whether the recommendation still fits the reader's actual situation. If it depends on perfect timing, unusual access, or a best-case budget, include a simpler fallback.
No comments yet. Be the first to share your thoughts!