Set up the x402 seller environment
To integrate x402 endpoints for AI trading signals, you first need to establish a seller environment capable of accepting payments. This process relies on the Coinbase Developer Platform (CDP) to generate the API keys and credentials required for your endpoint to recognize and validate x402-compliant requests.

If you don't already have one, sign up for a Coinbase Developer Platform account. This account serves as the central hub for managing your API keys and monitoring transaction activity. The platform provides the necessary infrastructure to interact with the x402 protocol securely.
Navigate to the API keys section within your CDP dashboard and generate a new set of credentials. You will need these keys to authenticate your server when it communicates with the x402 payment gateway. Store these keys securely, as they grant access to your seller environment.
Update your AI trading signal endpoint to include x402 headers in incoming requests. Your server must be configured to parse these headers, verify the associated wallet signature, and confirm that the payment has been settled on the Base network before delivering the signal data.
Use the CDP sandbox or a testnet wallet to send a simulated payment request to your endpoint. Verify that your server correctly rejects requests without valid x402 headers and successfully processes those with settled USDC payments. This step ensures your integration is robust before going live.
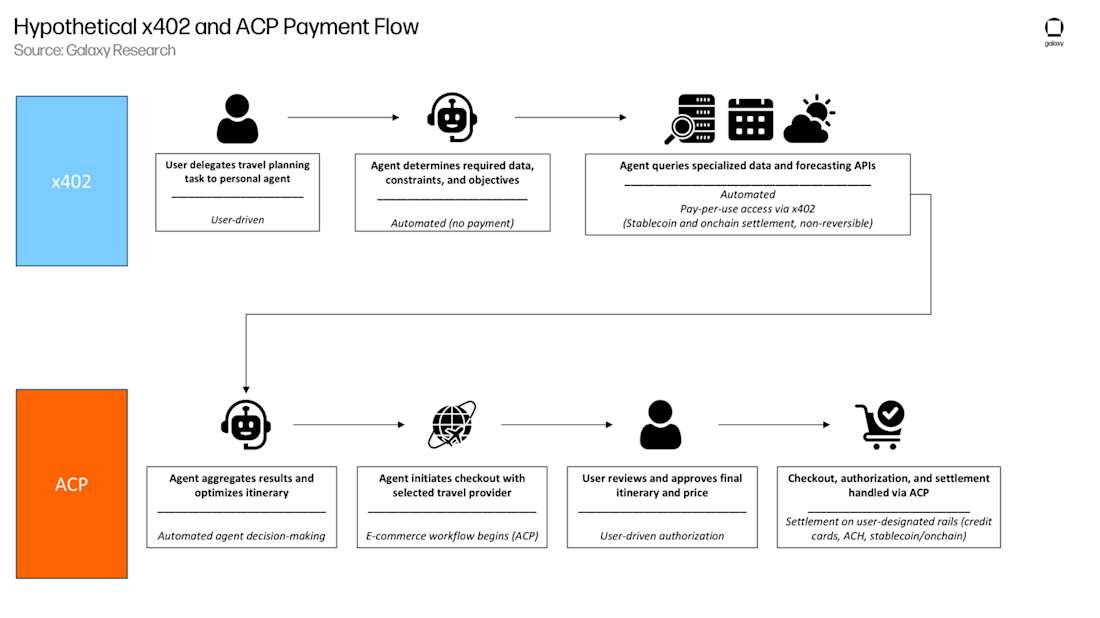
Configure the HTTP 402 Response Logic
To integrate x402 endpoints for AI trading signals, your API must first signal that payment is required. When an AI agent or user hits your endpoint without valid credentials or payment, the server returns a 402 Payment Required status code. This isn't just an error; it's a structured invitation to pay.
The response body must include specific metadata that tells the agent exactly how much to pay, in which currency (usually USDC), and where to send it. Once the agent pays, it receives a payment receipt (often a signed transaction hash or token) and retries the request with this proof attached in the Authorization header.
Here is the step-by-step process to implement this logic in your trading signal API.
By following this sequence, you ensure that your AI trading signals are monetized automatically without manual intervention. The x402 protocol handles the payment flow, allowing your API to focus on delivering accurate market data.
Implement the client payment flow
Once your AI trading signal endpoint returns a 402 Payment Required status, the client software must handle the transaction autonomously. This flow relies on the x402 protocol, which embeds payment instructions directly into the HTTP response headers. The client detects the blockage, executes the USDC transfer, and retries the request with proof of payment attached.
This automated loop allows your AI agent to purchase trading signals without human intervention. By treating payments as a standard part of the HTTP lifecycle, you enable scalable, pay-per-use access to high-value market data.
Validate signals with x402 V2 standards
Before connecting your AI trading agents to live markets, you must ensure your implementation strictly follows the x402 V2 protocol. This version standardizes how networks and assets are identified, creating a single payment format that works across chains without requiring custom logic for each integration.
The V2 upgrade shifts x402 from a single-chain experiment to a multi-chain default. Your endpoints must now handle stablecoins and tokens across Base, Solana, and other L2s seamlessly. If your validation logic still relies on legacy, chain-specific identifiers, your agents will fail to pay for data or, worse, send payments to the wrong network.
Check multi-chain compatibility
Verify that your signal provider’s API accepts payments via the standardized V2 headers. This includes confirming that the x-payment-asset and x-payment-chain headers match the supported networks listed in the official x402 documentation. Your code should dynamically adjust these headers based on the user’s wallet, rather than hardcoding a single chain.
Verify standardized asset IDs
x402 V2 uses a unified format for asset identification to prevent ambiguity. Ensure your trading bot resolves token addresses correctly across different chains. For example, a USDC contract on Base is different from one on Solana, but the V2 protocol handles the routing automatically if your client library is up to date. Test this by sending a micro-transaction to a testnet endpoint to confirm the signal is delivered upon payment.
Confirm HTTP-native payment flow
The core advantage of x402 is instant, automatic stablecoin payments directly over HTTP. Validate that your integration does not require off-chain settlement steps or manual wallet approvals for every signal request. The payment should be embedded in the API call itself, allowing your AI agent to retrieve liquidity data or trade signals immediately after the transaction is confirmed.
Test the autonomous payment loop
This section verifies that your AI agent can request a trading signal, pay the x402 endpoint, and receive the data without human intervention. We will simulate a complete transaction cycle to ensure the payment logic and data delivery work as expected.
Before testing, ensure your AI agent has the necessary credentials. This includes a valid wallet address, sufficient stablecoin balance (USDC on Base is recommended for low fees), and the endpoint URL for your trading signal service. Verify that your x402-compliant API is running and ready to accept requests.
Your AI agent should send an HTTP GET or POST request to the trading signal endpoint. At this stage, the server should respond with a 402 Payment Required status code. This response must include an x-x402-payment-url header or a JSON body containing the payment details, such as the amount, currency, and the blockchain network to use.
Using the payment details from the previous step, your agent initiates a transaction on the specified blockchain. For example, if the endpoint requires 0.01 USDC on Base, the agent will sign and broadcast the transaction from its wallet. Ensure the agent waits for the transaction to be confirmed on-chain before proceeding. This step confirms the agent can interact with the blockchain autonomously.
Once the payment is confirmed, your agent sends a second request to the endpoint, often including the transaction hash or signature as proof of payment. The server validates the payment and, if successful, returns a 200 OK status along with the trading signal data. This final step confirms the entire loop is functional: request, payment, and data delivery.
No comments yet. Be the first to share your thoughts!